Billing
Wave comes packaged with integrated billing. This means that you can charge your customers to access your application or features in your application.
Wave uses Stripe by default; however, you may wish to configure BrainTree as an alternative.
Stripe
Setting up your app to work with Stripe is super simple. This is going to be the easiest way to configure your application to accept payments.
In this section we will show you how to setup a Stripe account and add your Stripe credentials to Wave. We will cover how to setup Products and Subscriptions in the next section.
Create a Free Stripe Account
It's easy to setup a free Stripe account. Visit https://stripe.com/register and create an account.
After creating an account you'll be on your Stripe Dashboard. Then, to get your API keys you can click on the Developers->API Keys.
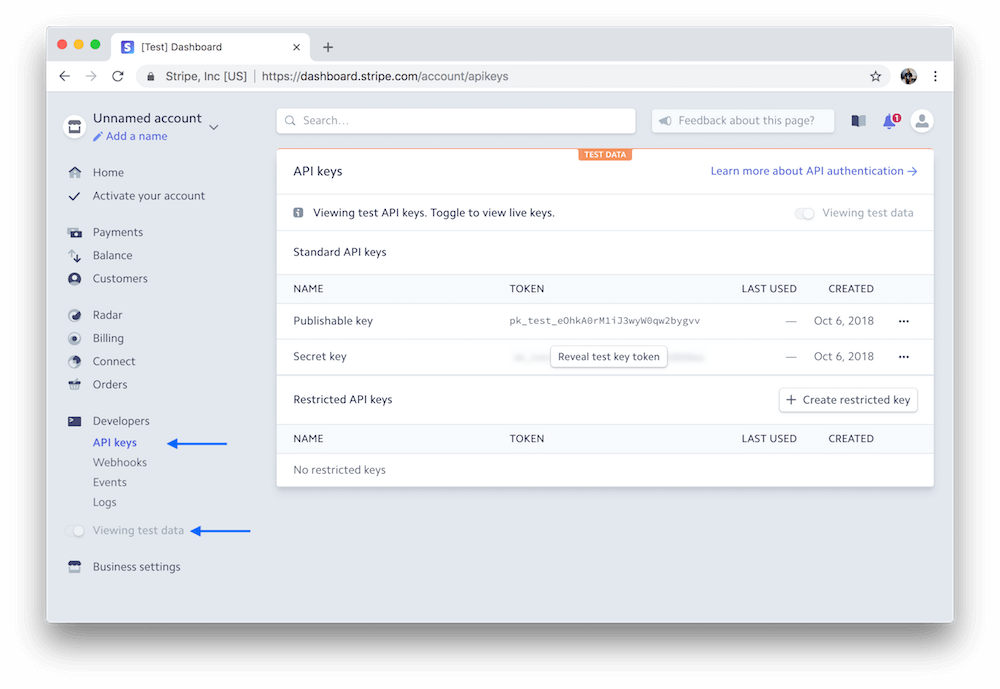
Adding Stripe API keys
{warning} You can test out payments with your Test API keys, but you will need to activate your account before you can view your Live API keys. To toggle between test or live data, you'll need to toggle Viewing Test Data (see previous screenshot).
Now, that you have your Stripe API keys we will need to add them to your application .env file. The .env file is where we store all our application environment variables including our Stripe API Keys. Find and update your stripe keys in the following variables.
STRIPE_MODE=test
STRIPE_TEST_KEY=pk_test_
STRIPE_TEST_SECRET=sk_test_
STRIPE_LIVE_KEY=pk_live_
STRIPE_LIVE_SECRET=sk_live_
Notice, when you are ready to go live with accepting real payments you will need to change STRIPE_MODE to live.
And That's it! You're ready to start accepting payments.
Stripe Test Credit Cards
There are many Stripe credit card numbers that you can use for testing, which can be found here. Here is an example card that you can use for testing purposes:
| Input | Value |
|---|---|
| CARD | 4242 4242 4242 4242 |
| EXP | Any date in the future |
| CVC | Any 3 digit code |
| ZIP | Any 5 digit zip code |
That's it for Stripe, next you may want to learn about subscriptions. Happy Billing ;)
BrainTree
If you are using Stripe for billing you can skip this section. In this section we will show you how to configure Wave to work with BrainTree Payments.
Add the BrainTree Migrations
BrainTree Payments use a few different database columns so we need to run an additional migration to make sure we have the necessary tables. This is simple enough, from the command line we can run the following artisan command:
php artisan migrate --path=/wave/database/braintreeAnd now your database is updated with the necessary BrainTree columns.
BrainTree Package
Next we need to remove the Stripe Billing package by running the following command:
composer remove laravel/cashierand then we need to require the BrainTree Billing package:
composer require "laravel/cashier-braintree":"~2.0"BrainTree Config Update
Then, we need to tell Wave that we are using braintree instead of stripe. We can do this by opening up config/wave.php and changing:
'billing' => 'stripe',to:
'billing' => 'braintree',Create a BrainTree Account
Next, you will need to create a BrainTree account. You will have to apply for an account by entering information about your business, but in the meantime while you are still testing you can signup for a Sandbox account at https://www.braintreepayments.com/sandbox
After creating an account we can then move on to the next step and add the BrainTree API keys to your application.
Adding BrainTree API keys
After logging in to your BrainTree Sandbox account you should be on your BrainTree dashboard. Scroll down to the bottom and you will see your Merchant ID, Public Key, and Private Key.

You can then enter those values in your application .env file by updating the following variables:
BRAINTREE_ENV=sandbox
BRAINTREE_MERCHANT_ID=
BRAINTREE_PUBLIC_KEY=
BRAINTREE_PRIVATE_KEY=
BRAINTREE_TOKEN=
You can set your BRAINTREE_ENV to sandbox while testing, and then switch that out with production when you are ready to go live. You will also need to swap our your BRAINTREE_MERCHANT_ID, BRAINTREE_PUBLIC_KEY, AND BRAINTREE_PRIVATE_KEY with your production keys before you go live.
You've probably noticed one more variable that we do not have a value for, BRAINTREE_TOKEN. We need this Token to talk to the BrainTree SDK, so let's go ahead and generate a new toekn.
To generate a BrainTree token, visit the BrainTree dashboard and hover over the Account button at the top right and click My User. Then on that page scroll down until you see a section called API Keys, Tokenization Keys, Encryption Keys (see screenshot below)

Click on the View Authorizations button and you will see the following screen:
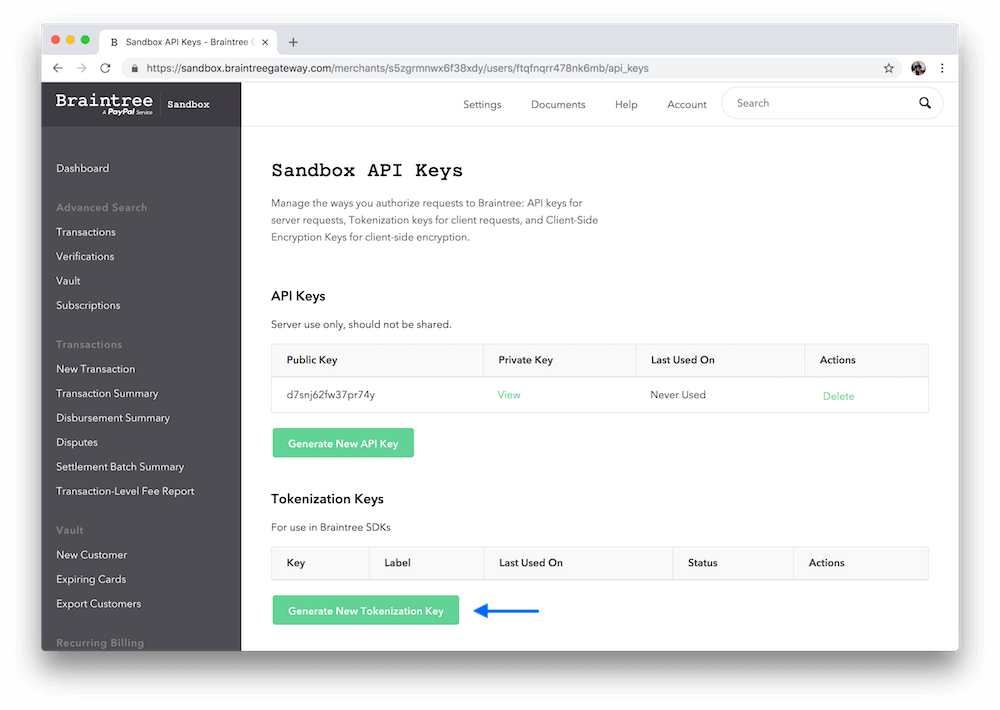
Click on Generate New Tokenization Key and it will create a new Token Key. Add this token value for the BRAINTREE_TOKEN variable in your application .env file.
BrainTree Testing
You can use this card for testing 4111 1111 1111 1111, with any expiration date or cvc code.
In order to test out a PayPal user you will need to create an account at https://developer.paypal.com/ and create a new SandBox account.
{info} Wave is using Laravel Cashier Billing under the hood, if you need additional configurations you may want to visit the Laravel Cashier billing documentation: https://laravel.com/docs/5.6/billing#braintree-configuration
That's it for setting up BrainTree. You will now be able to accept payments with BrainTree.